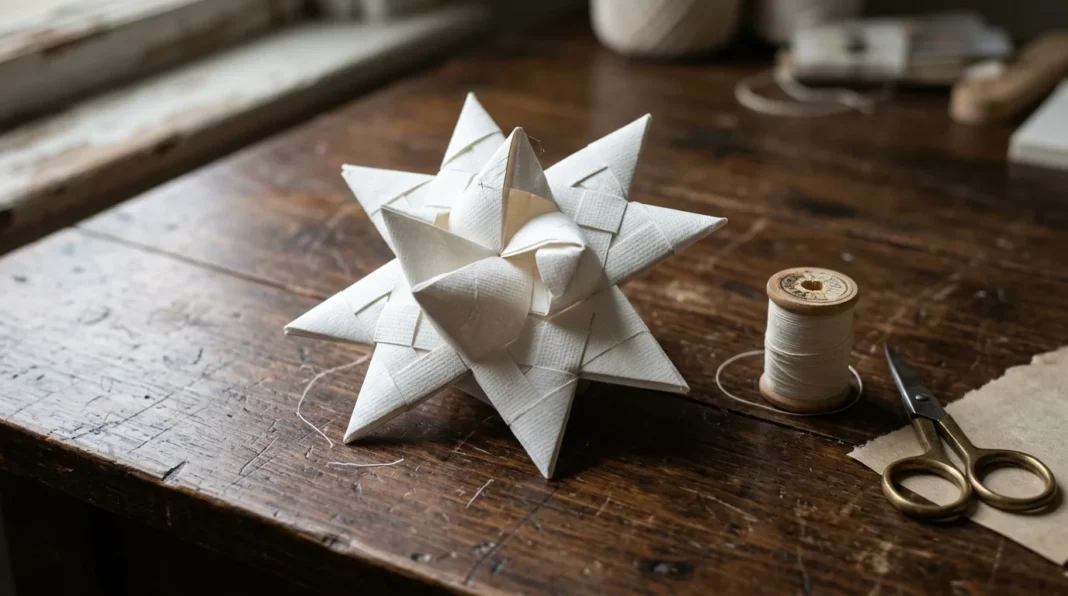
Making DIY Paper Christmas Stars That Hang Straight On The Tree
DIY paper Christmas stars are an easy way to give a tree a Nordic look. The classic one is a Froebel star. It starts as four paper strips and ends as an eight-pronged star with no glue at all. This guide teaches that star in full. It also gives short previews of the clay tags, dried flowers and window wreaths that usually hang beside it.
Key Takeaways:
- A Froebel star uses four identical strips with a width-to-length ratio between 1:25 and 1:30.
- The 3D star takes about forty weaving and folding steps and needs no glue.
- Stop partway and you hold a flat eight-pronged star. Finish and you get the 3D one.
- Sealing air-dry clay does not waterproof it, so clay tags belong on an indoor tree.
- Check a hook’s weight rating before any wreath goes on glass.
Paper stars rarely hang alone. A Scandinavian tree usually adds small clay ornaments and a dried flower sprig or two. A wreath on the window finishes the look. Each of those has its own way to go wrong. Clay cracks and dried petals fade and a heavy wreath can drop off the glass. So each short preview below names the problem and points to a full fix.
Five Guides That Take A Paper Star From Strip To Window
Five guides follow. Two cover clay tags: the first seals, and the second stops cracks. The paper star sits in the middle because it is the one explained in full here. After it come dried flowers that keep their color and a heavy wreath that stays on the glass. The four outer guides are short previews and each points to a complete article. Every guide carries a table of sourced facts.
Sealing Air Dry Clay Star Tags Before They Hang
Small clay tags look lovely hanging beside paper stars. Wait for the clay to dry all the way before you seal it. Gathered says the piece must be completely dry and free of dust first. Then apply two or three thin coats and let each one dry thoroughly before the next. Seal the back of the tag as well as the front. The full steps are in how to seal air dry clay waterproof.
People search for waterproof clay, but the honest answer is no. Gathered says it isn’t possible to make air-dry clay waterproof and that a coat only adds water resistance. Polyurethane or acrylic sealers give the most and Mod Podge gives little. So a sealed tag belongs on an indoor tree and never on a porch. Keep it away from a steamy kitchen and a bathroom too. The table below details air dry clay sealing guidelines established by Gathered specialists.
| Number & Insight | Source | Expert/Team |
|---|---|---|
| 2 or 3 thin coats with full drying between each one | Gathered, “How to seal air dry clay: A guide to varnish and sealants,” updated September 2025 (checked November 2026) | Sarah Jackman Read, Gathered |
| Polyurethane or acrylic sealer gives the most durable water-resistant finish, while Mod Podge gives little water resistance. | Gathered, “How to seal air dry clay: A guide to varnish and sealants,” updated September 2025 (checked November 2026) | Sarah Jackman Read, Gathered |
| Air-dry clay cannot be made waterproof, so pieces are displayed indoors | Gathered, “How to seal air dry clay: A guide to varnish and sealants,” updated September 2025 (checked November 2026) | Sarah Jackman Read, Gathered |
Why Air Dry Clay Ornaments Crack While Drying
Clay cracks when it dries unevenly. Thin spots dry before thick spots and the two pull against each other. Roll tags to an even thickness and keep them away from heaters while they dry. Turn them over now and then so both faces dry at the same pace on the rack. The full fix is in why air dry clay cracks while drying.
Wikipedia’s page on pottery fracture says cracks come from uneven drying that moves from thinner to thicker spots. It says poor drying leaves weak ware and it names uniform wall thickness and even drying as the prevention. The page covers fired pottery and never mentions air-dry clay or gives numbers. So read it as the idea behind cracking. Slow drying away from heat and drafts is craft practice and not a quote from the page. The table below details pottery fracture guidelines established by Wikipedia editors.
| Number & Insight | Source | Expert/Team |
|---|---|---|
| Cracks come from uneven drying that moves from thinner to thicker spots | Wikipedia, “Pottery fracture” (checked November 2026) | Wikipedia editors |
| Poor drying gives low strength in the finished ware | Wikipedia, “Pottery fracture” (checked November 2026) | Wikipedia editors |
| Prevention is uniform wall thickness and even drying of greenware | Wikipedia, “Pottery fracture” (checked November 2026) | Wikipedia editors |
Folding A Froebel Star From Four Paper Strips
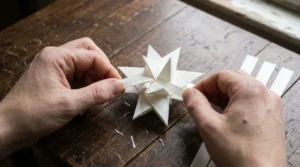
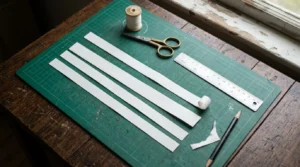
Wikipedia’s entry on the Froebel star describes the 3D version as four identical strips with a width-to-length ratio between 1:25 and 1:30. So a 2 cm-wide strip runs 50 to 60 cm. About forty weaving and folding steps follow and none need glue. Stop partway and you hold a flat eight-pronged star. Finish and eight cone-shaped tips join the eight flat prongs. The table below details Froebel star construction guidelines established by Wikipedia editors.
| Number & Insight | Source | Expert/Team |
|---|---|---|
| A width-to-length ratio between 1:25 and 1:30 for each of four identical strips | Wikipedia, “Froebel star” (checked November 2026) | Wikipedia editors |
| About 40 weaving and folding steps and no glue | Wikipedia, “Froebel star” (checked November 2026) | Wikipedia editors |
| 8 flat prongs and 8 cone-shaped tips on the finished star while stopping partway, leaves a flat 8-pronged star | Wikipedia, “Froebel star” (checked November 2026) | Wikipedia editors |
| Traditionally dipped in wax and sprinkled with glitter | Wikipedia, “Froebel star” (checked November 2026) | Wikipedia editors |
| Fold descriptions date to at least the 19th century, including an 1891 children’s activity book. | Wikipedia, “Froebel star” (checked November 2026) | Wikipedia editors |
Cut the four strips together from thin paper that folds crisp. Origami paper and gift wrap both work. Weave each strip over the last and crease it flat before the next. Pull every fold snug so the star stays tight. Tuck the final ends under the woven layers and loop a thread through one tip. Tradition adds a wax dip and a sprinkle of glitter. A plain paper star looks just as good among DIY paper Christmas stars.
Keeping Dried Flower Sprigs From Fading On The Tree
Dried flowers add soft color between the stars on the branch. Sunlight is what bleaches them, so place the sprigs with care. The Royal Horticultural Society says to keep displays out of direct sunlight to limit fading and away from moist rooms such as bathrooms. Dry the stems upside down in low light with good ventilation first. The full guide is how to stop dried flowers fading.
The RHS says air-dried plants are ready in 2 or 3 weeks and pressed flowers in about a week. Strip the lower leaves and tie the stems with a rubber band. Statice and yarrow and grasses suit air drying. Start with good blooms because no amount of drying helps a poor flower look better. The page does not cover fixatives or storage, so those sit outside this preview. The table below details dried flower guidelines established by Royal Horticultural Society specialists.
| Number & Insight | Source | Expert/Team |
|---|---|---|
| 2 to 3 weeks for air-dried plants and about 1 week for pressed flowers | Royal Horticultural Society, “How to dry flowers and foliage at home” (checked November 2026) | Royal Horticultural Society staff |
| Stems tied with a rubber band and hung upside down in low light with good ventilation | Royal Horticultural Society, “How to dry flowers and foliage at home” (checked November 2026) | Royal Horticultural Society staff |
| Displays kept out of direct sunlight to limit fading and away from moist rooms. | Royal Horticultural Society, “How to dry flowers and foliage at home” (checked November 2026) | Royal Horticultural Society staff |
Hanging A Heavy Wreath On Glass Without A Fall
A heavy wreath needs a hanger rated for its weight. Hunker says to measure and weigh the wreath beforehand. Magnetic hangers on single-pane glass hold up to 10 pounds each and the largest suction hooks claim up to 25 pounds. The author still recommends a lighter wreath for any glass hanger. The full steps are in how to hang heavy wreaths on glass.
Clean the glass with rubbing alcohol or vinegar first. Dampen a suction cup with warm water and press it on. Then wait up to a full day before you hang the wreath. Tie the wreath on with floral wire or fishing line. Magnets suit single-pane windows only and lighter wreaths stay put best. Hunker never covers adhesive strips, so check each strip’s own pack for its rating. The table below details wreath hanging guidelines established by Hunker writer Kathy Adams.
| Number & Insight | Source | Expert/Team |
|---|---|---|
| Wreath measured and weighed before a hanger is chosen | Hunker, “How To Hang A Wreath On A Door Or Window,” October 2018 (checked November 2026) | Kathy Adams, Hunker |
| Magnetic hangers hold up to 10 lb each on single-pane glass only | Hunker, “How To Hang A Wreath On A Door Or Window,” October 2018 (checked November 2026) | Kathy Adams, Hunker |
| Largest suction hooks claim up to 25 lb, but a lighter wreath is recommended. | Hunker, “How To Hang A Wreath On A Door Or Window,” October 2018 (checked November 2026) | Kathy Adams, Hunker |
5 Smart Paper Choices For Stars With Sharp Points
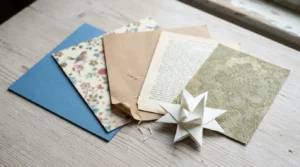
Paper decides how crisp the points come out. Origami paper is the first choice because it is thin, holds a fold and comes in single colors. Gift wrap gives you pattern. Kraft paper gives a plain Nordic look. Pages from an old book add a quiet vintage feel and wallpaper offcuts bring bold color. Pick one paper and cut all four strips from it.
Avoid thick card because it fights the weave and cracks at the folds. Test any paper first by folding a scrap strip over itself and creasing it. A good paper holds the crease without tearing or fuzzing. Cut the four strips from the same sheet so they match in weight and color. Strips from different sheets pull differently and the star twists.
3 Easy Ways To Hang A Paper Star Without Crushing It
A thread loop is the easiest. Pass a short length of thread through one tip with a needle and knot the ends. A hidden loop is neater. Tuck a looped thread in before you close the last fold and it stays out of sight. A ribbon tied around one prong suits a wreath or a tree branch. Pick whichever suits your tree.
Hang stars at the end of a branch so the points stay clear. Keep them away from candles and heaters because paper burns. Run one thread through a tip on each star to make a garland. Wikipedia says these stars hang on trees and wreaths and garlands and mobiles. Store them flat in a box lined with tissue so the prongs keep their shape.
5 Simple Fixes For A Star That Twists Or Comes Apart
A twisting star in DIY paper Christmas stars usually has uneven strips. Recut all four together so they match in length and width. Weave snugly because a loose weave lets the points open. Crease every fold flat with a fingernail before you move on. Tuck the final ends deep under the woven layers. The last fix is to press a sagging star flat under a heavy book overnight.
If the star still looks wrong, stop partway and keep the flat eight-pronged version. Wikipedia says stopping partway gives exactly that star. Use thinner paper next time because thick strips resist tight folds. Cut a spare set of strips ahead of time. A ruined star then costs you minutes and not a whole evening. Keep the spare strips flat in an envelope so they stay straight and ready.
A Paper Star Is Only The Start Of The Look
DIY paper Christmas stars come down to four matched strips and a snug weave. Hold the ratio between 1:25 and 1:30 and cut all four strips together. The clay tags beside them need even thickness, slow drying and an indoor spot. Dried flowers need shade and a wreath needs a hook rated for its weight. Each one is a small quick check you can make before the first fold.
Lettering on a wooden board sits well beside a Nordic tree and a paper star on it. For crisp edges, try why stencil paint bleeds into wood and how to stop it next. Did the star hold its shape for you today? Tell us in the comments and share this guide with a friend or family member who loves handmade Christmas decor.
Frequently Asked Questions (FAQs)
How do you make DIY paper Christmas stars?
DIY paper Christmas stars start with four identical strips cut to a width-to-length ratio between 1:25 and 1:30. Weave and fold them through about forty steps with no glue. Stop partway for a flat eight-pronged star or finish for the 3D one. Use thin paper and pull each fold snug.
What is a Froebel star?
A Froebel star is a woven paper Christmas decoration called a Fröbelstern in German. Wikipedia lists English names such as Advent star and Danish star, German star, Nordic star, Pennsylvanian star, Polish star and Swedish star. It is named for Friedrich Fröbel, who promoted paper folding in pre-primary education. The source thinks he likely did not invent it.
How long should the paper strips be?
Pick a width and multiply it by 25 to 30. A 2 cm strip runs 50 to 60 cm. Wikipedia gives the width-to-length ratio as between 1:25 and 1:30. Cut all four strips together so they match.
Do you need glue to make a paper Christmas star?
No. A classic Froebel star uses no glue because the strips are woven and folded. About forty steps hold it together. Tuck the final ends under the woven layers and the star stays closed.
Can you make a flat paper star instead of a 3D one?
Yes. Wikipedia says stopping partway gives a flat eight-pronged star. Weave and fold as usual and stop partway. A flat star hangs well on a window or a wreath ribbon.